Intro to syntax!
Alright syntax 101 for ssg! Syntax for ssg is pretty simple. Dead simple. Most of it is basic markdown syntax with some additional features like inserting a table or underlines since markdown syntax doesn't support these features(yet). You can check the source code for this page in clear markdown format here.
See that heading at top that says 'Intro to syntax'? Notice the header is in center of the page and it's a header 1. Here's how you can add a center header1 tag;
.ce header1: Intro to syntax!
Whatever after the colon(:) gets displayed on the main screen. Same way, you can add header2, header3 upto header4. Just add 1 or 2 or 3 or 4 after header and before :
# Paragraphs
To add a new paragraph, just start typing anything after a new line just like you would do in markdown files. Here every newline gets wraped around <p> paragraph tags.
# General header tags
General headers starts with # followed by header numbers. The header above that says '# General header tags' is a header2 writen like this;
## # General header tags
Also normal headers as well;
This is header 1
This is header 2
This is header 3
This is header 4
which is;
# This is header 1
## This is header 2
### This is header 3
#### This is header 4
# Bold texts
Bold tags follows basic markdown syntax, this is a bold text with double asterisks and this with double underscores which should look like this in raw mode;
**this is a bold text** with double asterisks and __this__ with double underscores
Note: If you're starting some line with bold or italic or bold-italic or urls then consider using underscores for bold,italic or bold-italics instead of asterisks and for urls use an extra space at the very begining.
# Italic texts
Italic texts with one asterisk * or one underscore _. This text is italic and this is also italic which in markdown format looks like this;
This text is _italic_ and this is also *italic*
# Bold-Italic texts
Bold-italic texts with three asterisks *** or three underscores ___. This text is bold italic and this is also bold italic
This text is ___bold italic___ and this is also ***bold italic***
# Underline texts
Markdown syntax does not come with any underline features, so this is how you do underlines for now, with three commas ,,,
this is how you do ,,,underlines,,, for now
# Strike Through texts
This text is a strike through text
This text is a ∼∼strike∼∼ through ∼∼text∼∼
# Sup and Sub Script texts
This text is a sup text and this is sub text
This text is a ^^sup^^ text and this is ^sub^ text
# URL texts
Follows default markdown syntax.
This is a url that leads to example.org and this to duckduckgo.com
[This](https://example.org) is a url that leads to example.org and [this](https://duckduckgo.com) to duckduckgo.com
You can also jump through sections with {id="idname"} after a header section and mentioning the idname in url section with [url link name](#idname)
This is a text and this is a [url](#another) which will jump to another section of the article.
This is some text and some more text
Again some text. Next portion is

### {id="another"} # Some header text

some more text
# Image add
Add paragraph images with .pimg: tags
.pimg: ../assets/basepage.png placeholder text

.caption: Image: Image example
The .pimg portion is calling paragraph image method, then basepage.png is the image file being called from previous directory assets and the later portion is just an alt, if image does not get displayed then show 'placeholder text'. The caption portion is what get's displayed below the image.
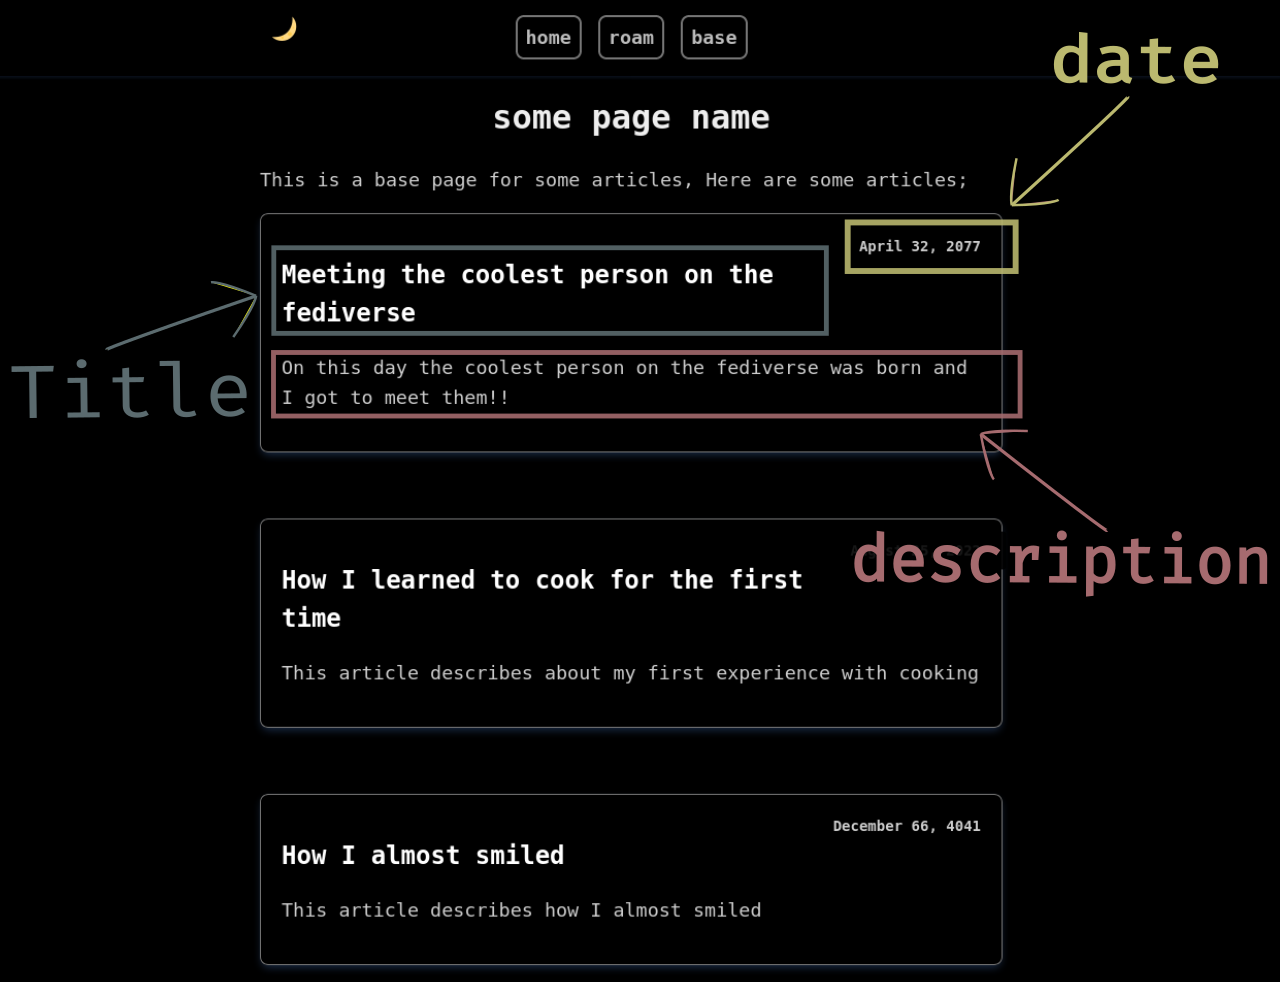
Alternatively you can also add class sections in images. The cover image(which is previously mentioned in css file) at the top looks like this in raw code;
.img: class="cover" ../assets/basepage.png placeholder text
Explanation: The .img method invokes class="cover" followed by the image file directory which is ../assets/basepage.png. The later portion is for accessibility which is an alt text. The spaces are separators in this case.
And yes you can also use default markdown syntax to add images as well;

.caption: Image: Image example
# Video addition
The video addition tag is pretty simple, follows a markdown alike syntax;
!
.caption: video: keynav and xmouseless
# Blockquotes
Blockquotes also follows markdown syntax but each > expands to a new-line;
> This is a text in a blockquote
> This is another line of text in a blockquote
Notice the extra one blank line above and one blank line below. This blank lines are necesary for blockquotes, also looks good too
This is a text in a blockquote
This is another line of text in a blockquote
# Unordered lists
Like you'd do in a markdown file;
* This is an item in an unordered list
* Another item
* And another item
Notice the blank lines above and below
- This is an item in an unordered list
- Another item
- And another item
You can also use dash - instead of asterisks
- This is an item in an unordered list
- Another item
- And another item
Alternatively you can also use '#.' symbols instead of bullet points followed by a full-stop
#. This is an item in an unordered list
#. Another item
#. And another item
- This is an item in an unordered list
- Another item
- And another item
# Ordered lists
Also follows normal markdown syntax.
1. Item 1 in ordered list
2. Item 2 in ordered list
3. Item 3 in ordered list
- Item 1 in ordered list
- Item 2 in ordered list
- Item 3 in ordered list
Alternatively you can also use alphabets;
a. Item 1 in ordered list
b. Item 2 in ordered list
c. Item 3 in ordered list
Which eventually transforms into numbers, unfortunately, ordered list doesn't respect alphabetical orders in html.
# Inline codes
You've noticed me typing inline tags like this. Here's how to do it;
The text `code` will be an inline code
The text code will be an inline code
If you want literal backticks just do escapes
The text \`code\` will have literal backticks
The text `code` will have literal backticks
# Table addition
Tables are very easy to add. .th: is for table header, .td: is for table data. Here's how you add tables;
+++++++++++++++++table

.th: header 1
.th: header 2
.th: header 3
.th: header 4
.th: header 5

.td: data 1
.td: data 2
.td: data 3
.td: data 4
.td: data 5

.td: data 6
.td: data 7
.td: data 8
.td: data 10
.td: data 11

.td: data 10
.td: data 11
.td: data 12
.td: data 13
.td: data 14

.td: data 15
.td: data 16
.td: data 17
.td: data 18
.td: data 19

----------------table

.caption: Table: A Demo Table
Notice the blank line before .th on line 1 and a blank line after the last .td: data 14. Blanks are important
| header 1 | header 2 | header 3 | header 4 | header 5 |
|---|---|---|---|---|
| data 1 | data 2 | data 3 | data 4 | data 5 |
| data 6 | data 7 | data 8 | data 10 | data 11 |
| data 10 | data 11 | data 12 | data 13 | data 14 |
| data 15 | data 16 | data 17 | data 18 | data 19 |
# Add Month date, year
If you invoke [ .today ],(with nospaces) this will add today's date like this;
Today is October 10, 2021, the day seems nice, and I'm feeling good today
Today is [.today], The day seems nice and all, and I'm feeling good today
Add a next page url
You can also add next page href link to basepages;
.next[next->](base2.html)
# Code block section
Code block section is mostly similar to the default markdown syntaxes with some changes/added features. This is how you do code blocks;
#!/usr/bin/env sh
echo "hello world"
The portion above is a code block, which when writing should be written like this;
```no
	#!/usr/bin/env sh
	echo "hello world"
```
/ the backslashes are escapes /
Every code block section should have an extra tab in front of each line. Notice the extra tabs before each line within backticks. The tabs gets rearranged into their original form when viewed from the web browser. The no portion means this is code section does not need to viewed as raw. Viewing in raw mode is similar to copying texts, but with view raw mode, you can curl or wget only the code portion instead of downloading the whole source code for the website then deleting all extra codes later. That's a pain.
This is what it looks like with view raw mode;
#!/usr/bin/env sh
echo "hello world"
view raw
This is what you'd actually type in;
```1
	#!/usr/bin/env sh
	echo "hello world"
```
.code1
The view raw text method uses serial number based code block arrangement in a separate directory assigned for raw code sections. The 1 after 3 backticks means it's the first code that needs to have a view raw section and the .code1 later get's transformed into "view raw". The serial number should be same for 1 and .code1. Then for a second code block with view raw option you'd do 2 and the .code2 like this;
#!/usr/bin/env sh
echo "this is a second code block"
view raw
This would look something like this when writing;
```2
	#!/usr/bin/env sh
	echo "this is a second code block"
```
.code2
So, no after 3 backticks means just normal code block section, no view raw code, and a numerical digit means it's supposed to be viewed as raw. Now from now on if I wanted to add another view raw code block section, I'd do 3 backticks and the add 3 to it and then add .code3 after code block section.
Note: Don't break the serial number however, if you mentioned code block with 1 then assign the next one with 3, this wouldn't work properly
# Horizontal line
I made a customized horizontal line, just invoke .hr
.hr
This should print out a horizontal line like below;
# Line breaks
Do line breaks with .br
This is a text
.br
This is another line of text but on a new line
# Comments
Comments are more like c11 style, this is how you do comments;
This is some text /* this is a comment */
This is another line of text
From the command line, you can also enable or disable comments;
$ sh main.sh html -c file.md
Comments are removed by default when no flags are mentioned.
# Nested blockquotes (experimental)
You can also do nested blockquotes but they are still experimental. Here's how you do nested blockquotes;
> This is some text in blockquotes
> Another line of text in a blockquote
>> This portion is in nested blockquotes
>> This portion is also in a nested blockquote on a new line
> This text is in normal blockquotes
This is some text in blockquotes
Another line of text in a blockquote
This portion is in nested blockquotes
This portion is also in a nested blockquote but on a new line
This text is in normal blockquotes
# Escape characters
You've noticed that underscores _ and * asterisks are used as tag syntaxes. Well you can use literal underscores and asterisk with backslashes \ _ without any spaces in between them;
This is \_ underscore and \* is an asterisk and \` this is a backtick
Will print out;
This is _ underscore and * is an asterisk and ` this is a backtick
If you want to use literal \_ just use double backslashes;
This is \\_ underscore and \\* is an asterisk and \\` this is a backtick
Will print out;
This is \_ underscore and \* is an asterisk and \` this is a backtick
That's it for basic syntax. Learn how to write base.md files on the next article or learn how to write index.md pages here. Check the source code for this site over here
Made with <3 by samiuljoy